
While there may be a reality in photography more real than reality, the field of view of a photograph, even one taken with a wide angle lens, can never compare to that of one's eyes. There's a way to come close, though: Panoramic photography. Basically several pictures, usually taken panning across a landscape, are stitched together to give a greater field of view than that of any one picture. The result can sometimes be breathtaking.
Some cameras, such as my late Kodak M1063 (one of the best point-and-shoot cameras, in my opinion), had a three picture auto-stitch feature, which worked brilliantly. It went so far as to show you a little of the last picture in the viewfinder so that you could align the shot perfectly. Three clicks and a short wait later, and you had a perfect panorama.
The Canon I now use doesn't come with this feature, but what it did have was a nifty piece of in-box software, Canon Photostitch. It works a charm as long as you've been careful when taking the pictures. The main problem I encounter when doing this by hand is that it is difficult to position the camera perfectly, especially when taking close up or 360° panoramas. This is because holding the camera in front of you and pivoting about your rough centre is wrong. When the subject of the panorama is far away, then this is negligible, but indoor panoramas - or those in enclosed or smaller space - are ruined.
Somewhere along the way, I heard of a panoramic tripod head, which differs from a standard tripod head in that it keeps the entrance of the lens at the same point in space as the camera moves. This is handy because it removes the error of parallax completely, allowing for seamless and natural looking panoramas.
I had to get me one.
So I looked it up online, and was surprised at the price. A good one can cost close to $100, and looks something like this. So that was out for me, seeing as my budget - besides not existing - doesn't allow for that kind of expenditure on a tripod.
My next step, of course, was to find an alternative. That's when I found this wikihow article, which explains how to make one from some wood. It seemed like I had the answer, but I didn't get around to it immediately. I then had a 'Eureka!' worthy moment (in more ways than one). I'd make one out of LEGO!
Now, Lego has come a long way from being merely some coloured blocks. I've had the Lego Robotics Invention System 2.0 for some time, and it seemed perfectly suited to the task. Combined with some pieces from my Vision Command set, I was able to construct my own motorised panoramic base.

It's not at all sleek, and it looks nothing like either the real thing or the wooden knock-off, but it works beautifully and left me feeling well chuffed.
I started building the cradle for the camera first, reasoning that this would be the hardest and most important part. Turns out I was right, and it took three attempts to get it just right. The thing about it is that I had to design - using only Lego - a support system for a camera of unobliging proportions. Had I used the VGA camera from the vision command set, it would've slotted neatly into any Lego contruction, being Lego itself, but then I'd have to settle for grainy washed out panoramas of approximately 5 megapixels. Sounds like a lot, yes, but that's spread across 18 pictures, the average panorama image. This way, I could use a 9.0MP Canon which would produces on average 100 megapixel panoramas at full size, a notable difference.

This, the first manifestation, was perfectly suited to holding the Canon SX110is. It even locked shut, so the camera could be securely tilted. The only problem was that it consumed too many pieces and left little for the construction of the base and motor structure. It was beautiful, but useless, so I reluctantly broke it up and tried again, bearing in mind the great Economic challenge of unlimited wants and limited resources.
The next was much more successful. It used about twelve major pieces, as opposed to the greedy monstrosity above. The compromise was that the camera would fit in from above and rely on gravity and side supports to keep it there.

This time, the part that didn't work was the counterweight and my choice of axis. In a moment of mental absence, I worked out that the whole deal would pivot about the middle (where the grey bits are). I then realised that the entrance to the lens would be considerably closer to the cradle, and therefore so would the pivot be. I'd finally hit on a promising idea; all that was left was to make it work.


Above is a profile of the final thing, camera included. As you can see, it's much stubbier and compact than v2, although it retains the camera support structure. Notice that the point where light enters the lens is above the pivot - the purpose of the entire exercise.
I used the chunky original Lego Bricks to form a rigid base, allowing
the entire contraption to be moved easily and without fear of buckling.
The reason for the vivid colours is that I didn't have enough black bricks.


The cradle worked out surprisingly well, considering the clash between the perfect harmony of Lego and the weird bulbous intrusion that is the camera. The Canon slips easily in, but is firmly secured once it rests on the pedestal inside the cradle.
 The brain that runs the whole thing is the yellow Lego RCX Brick, a little marvel of technology, with three output ports for motors and lights, and three input ports for touch, light, temperature and rotational sensors. I needed only one motor and two touch sensors (bottom, right).


The effect of 360° panoramas is not so readily apparent. At a glance, it looks like a very long, but stock standard panorama. Things close to the camera are very distorted, and the whole picture rises and falls as you move from corner to corner if it's in a small space. Upon closer inspection, you might notice that all four walls have somehow made it into one picture, or that the two opposite edges of the picture seem to match up.


The one below was taken at sunrise in our garden.

Still, this is not enough. To get a true sense of the scope of a full panorama, it needs to be viewed like this.


I used one Lego motor and two consecutive worm-gear set-ups at right angles (left). One worm gear is usually slow and powerful enough, but I wanted to be safe and not stress the motor. The second worm gear means that the axle's movement is almost undetectable, but its torque is almost inexorable.
The stiffness and shape of the shutter button, combined with the inverse relationship between speed and power when using Lego gears meant that I was unable to make an automatic shutter. That would've been nice, because then the machine could spin a full circle taking pictures on its own. My attempts at an automatic shutter actuator ended up squeezing the cradle to pieces without ever taking a picture. Perhaps next time. As it stands now, I use the little blue gadget (right) to press the shutter button. I use a custom timer that waits a second before taking the picture, so that any shake introduced by my pressing has time to stop.
When I get up the nerve to take this one apart, I'm hoping to make one that looks a bit more like the real thing, with motorised movement in both the X and Y axes, or an automatic shutter.
●
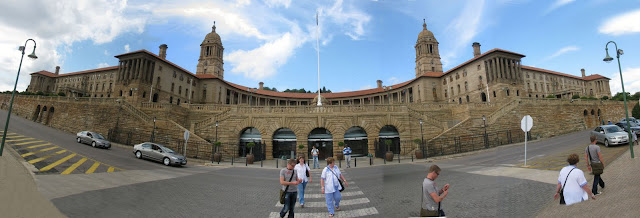
Normal panoramas, with three to nine component images, like those below, can usually be displayed as is, and one can fully appreciate the scope of the picture.


The effect of 360° panoramas is not so readily apparent. At a glance, it looks like a very long, but stock standard panorama. Things close to the camera are very distorted, and the whole picture rises and falls as you move from corner to corner if it's in a small space. Upon closer inspection, you might notice that all four walls have somehow made it into one picture, or that the two opposite edges of the picture seem to match up.
Unfortunately, the stand is not very portable and so I have not yet braved the outside world with it. All the panoramas I've taken it with have been perfect, but boring, mostly of the inside of our house.

The one below was taken at sunrise in our garden.

Still, this is not enough. To get a true sense of the scope of a full panorama, it needs to be viewed like this.
(I have no idea if this will work. If it doesn't, then click here to open the panorama in a separate window. I think there's an issue with Firefox, but Safari seems to work fine. If that doesn't work then you'll just have to imagine the picture wrapped around your head)


I am very very very impressed.
ReplyDeletevery.
gawsh, thanks (:
ReplyDelete